Showing posts with label advent. Show all posts

Monday, November 17, 2014

Advent Calendar

I just became aware of a 2014 Advent calendar that can be downloaded for free.   It is "Journey to the Manger:  2014 Advent Activity Calendar" and is offered by Thriving Family magazine which is a Focus on the Family publication that encourages, teaches, celebrates, and inspires families to thrive in Christ.

You can prepare for Christmas as a family and learn more about Bible characters related to the Nativity.  Scripture, a lesson, an activity, a prayer, and a puzzle is provided for each day of Advent.  The downloads include:

  • Advent poster - full-color and black-and-white versions
  • character cutouts - 26 individual Bible characters
  • parents' guide - for 26 days of Advent
  • kids' puzzles - 26 different puzzles


1.  Print out the Advent poster and assemble it.  Hang it in a central location in your home.


2.  Print out the characters of Christmas.  Each day of Advent, your child can cut out the Bible character for that day and attach it to the poster.  It might take a bit of searching to find the correct location!  (The character's background should be matched to the image on the poster.)


3.  Each day, plan the Scripture reading, short lesson, child-friendly activity, and prayer that highlights a different person or animal related to the Nativity.  The parents' guide has it all laid out!


4.  After enjoying a time of family fun and reflection, let your child work on a puzzle page.  For each day of Advent, there is a related puzzle, interesting Bible fact, and suggestions for discovering more!

Treasure the season of Advent as you lead your family on a faith-filled journey to the manger.  You can find the free downloads here.


Advent starts on November 30th!


photos source:  Thriving Family

Saturday, November 30, 2013

Book and Ornament Advent

T and I had such a good time last year with our book advent.  So, we are going to do it again this year!  :)  Here are the books I've selected for this year:

     A Shepherd's Gift
          by Mary Calhoun
     Careful, Santa!
          by Julie Sykes
     Christmas in the Barn
          by Margaret Wise Brown
     Gingerbread Baby
          by Jan Brett
     I Love Christmas!
          by Hans Wilhelm
     My Christmas Stocking, Filled with God's Love
          by Crystal Bowman
     My Merry Christmas and the Real Reason for Christmas Joy
          by Sally Lloyd-Jones
     One Snowy Night
          by M. Christina Butler
     Room for a Little One
          by Martin Waddell
     Saint Francis and the Nativity
          by Myrna A. Strasser
     Santa Mouse
          by Michael Brown
     Sugar & Spice - The Yummy Scents of Christmas
          (author unknown)
     The Christmas Story
          by Carol Heyer
     The Donkey's Christmas Song
          by Nancy Tafuri
     The Little Christmas Tree
          by Karl Rühmann
     The Littlest Christmas Tree
          by Janie Jasin
     The Night Before Christmas
          by Jan Brett
     The Twelve Days of Christmas
          by Jan Brett
     The Very Snowy Christmas
          by Diana Hendry


Actually, this list is all of the books we didn't get to last year...which is most of
them!  :P


I especially want to read the book, The Christmas Story by Carol Heyer.  She (the author!!) was so kind to visit my blog and leave a comment last year!  :D


For the first 18 days of December, T and I will read a Christmas book and make an ornament each day.  Then on December 24th, T and I will read the book, The Night Before Christmas...and hopefully make an ornament!


We will see if we can manage to read more Christmas books and make more ornaments than we did last year!  ;o)

Thursday, December 13, 2012

Rudolph the Red-Nosed Reindeer

Today we read Rudolph the Red-Nosed Reindeer as adapted by Rick Bunsen and made a Rudolph ornament.

Product Details

Rudolph is a reindeer with a glowing nose.  When the other reindeer make fun of him, Rudolph runs away.  Hermey, a misfit elf, and Yukon Cornelius, a prospector, help Rudolph learn that he shouldn't run away from his problems.  Rudolph returns to the North Pole and discovers that Santa desperately needs his help!


T loves this story.  We have the DVD, also, which T watches all year long!  
;o)
          Rudolph, the red-nosed reindeer
          had a very shiny nose.
          And if you ever saw him,
          you would even say it glows.
Working as an advertising executive, Robert May had a natural flair with words and was able to compose the Rudolph the Red-Nosed Reindeer poem which was specifically designed to appeal to children.  This marketing ploy was a massive success, and approximately 2.5 million poems were given away in the first year of its publication.
In 1949, singer Gene Autry recorded a musical version of Rudolph the Red-Nosed Reindeer, composed by Johnny Marks.
T made a Rudolph ornament from craft sticks.


Supplies:

  • three craft sticks
  • brown paint
  • paintbrush
  • glue
  • wiggly eyes
  • red pom-pom
  • hemp cord (for hanging)

Directions:

Paint the craft sticks brown.  Allow them to dry thoroughly.

Glue together two crafts sticks to form a "V" shape.  Glue the third craft stick on top of the "V" and close to the top* of the "V" to form a triangle.  *Allow approximately an inch of the top of the "V" to stick up (to resemble antlers).  Allow the ends of the third craft stick to stick out beyond the "V" (to resemble ears).


Glue a red pom-pom to the tip of the "V" (for the nose).


Glue two wiggly eyes to the "V" below the third craft stick.


Glue a piece of hemp cord to the top back of the ornament.  Let it dry thoroughly, and then hang the ornament on your Christmas tree!  :)


My inspiration for the ornament:
   DLTK
   The Ramblings of a Crazy Woman

Linked to:
   Christmas Ornament Party
   Christmas Craft Party
   12 Days of Christmas Party
   Read Explore Learn
   Read-Aloud Thursday
   The Children's Bookshelf
   Love Books
   Mom's Library
   Learn & Link
   Link & Learn
   For the Kids Friday

   T.G.I.F. Party
   Shine on Fridays
   Show-and Share Saturday
   Show & Tell
   Tip-Toe Thru Tuesday
   Enchanted Thursdays
   Clever Chicks
   Pin Me Party

Monday, December 10, 2012

O Little Town of Bethlehem

Today we read O Little Town of Bethlehem by David Mead and Chris Sharp and made a town of Bethlehem ornament.

Product Details
O little town of Bethlehem
how still we see thee lie.
Above thy deep and dreamless sleep
the silent stars go by.

~from O Little Town of Bethlehem
This board book features instrumental music and lights.  The Christmas carol, "O Little Town of Bethlehem," plays and stars light up when the cover is opened.  The story of the first Christmas is presented very simply.

T made a town of Bethlehem CD ornament.


Supplies:
  • bright yellow card stock
  • scissors
  • CD
  • glue
  • ribbon (for hanging)

Directions:

Print the town of Bethlehem, and cut it out.


Glue the picture to the center of the back of the CD.

Front of the ornament =
Back of the CD

Glue a yellow circle to the front of the CD, catching the ends of a piece of ribbon under the edge.

Back of the ornament =
Front of the CD

Let it dry thoroughly, and then hang the ornament on your Christmas tree!  :)


Linked to:
   Christmas Ornament Party
   Christmas Craft Party
   12 Days of Christmas Party
   Focus on the Nativity
   Love Books
   T.G.I.F. Party #57
   Shine on Fridays
   Clever Chicks #12
   Pin Me Party #10

Saturday, December 1, 2012

This Is the Star

Today we read This Is the Star by Joyce Dunbar and made a star ornament.

Product Details
This is the star in the sky.
~from This Is the Star
This retelling of the Nativity story is written as a simple, cumulative poem describing the holy night.

The illustrations are stunning oil paintings.


T made a Christmas star ornament from craft sticks.


I provided lots of embellishments, but T wanted only to use the gold sequins to decorate his star!

Supplies:

  • six yellow-colored craft sticks
  • glue
  • gold cord
  • gold acrylic jewels, gold sequins, yellow and gold buttons, yellow and gold beads

Directions:

Glue together three craft sticks to form a triangle.  Catch the ends of a piece of gold cord between the ends of two of the craft sticks (to form a loop for hanging).


Glue together the other three craft sticks to form another triangle.


Glue one triangle on top of the other to form a Star of David.


Decorate the star!


Let it dry thoroughly, and then hang the ornament on your Christmas tree!  :)


My inspiration for the ornament:
   Activity Village

Linked to:
   Christmas Ornament Party
   Christmas Craft Party
   12 Days of Christmas Party
   Read Explore Learn
   Love Books
   T.G.I.F. Party #56 (Living Life Intentionally)
   Shine on Fridays
   Clever Chicks #11
   Pin Me Party #9

Thursday, November 29, 2012

Asleep in the Stable

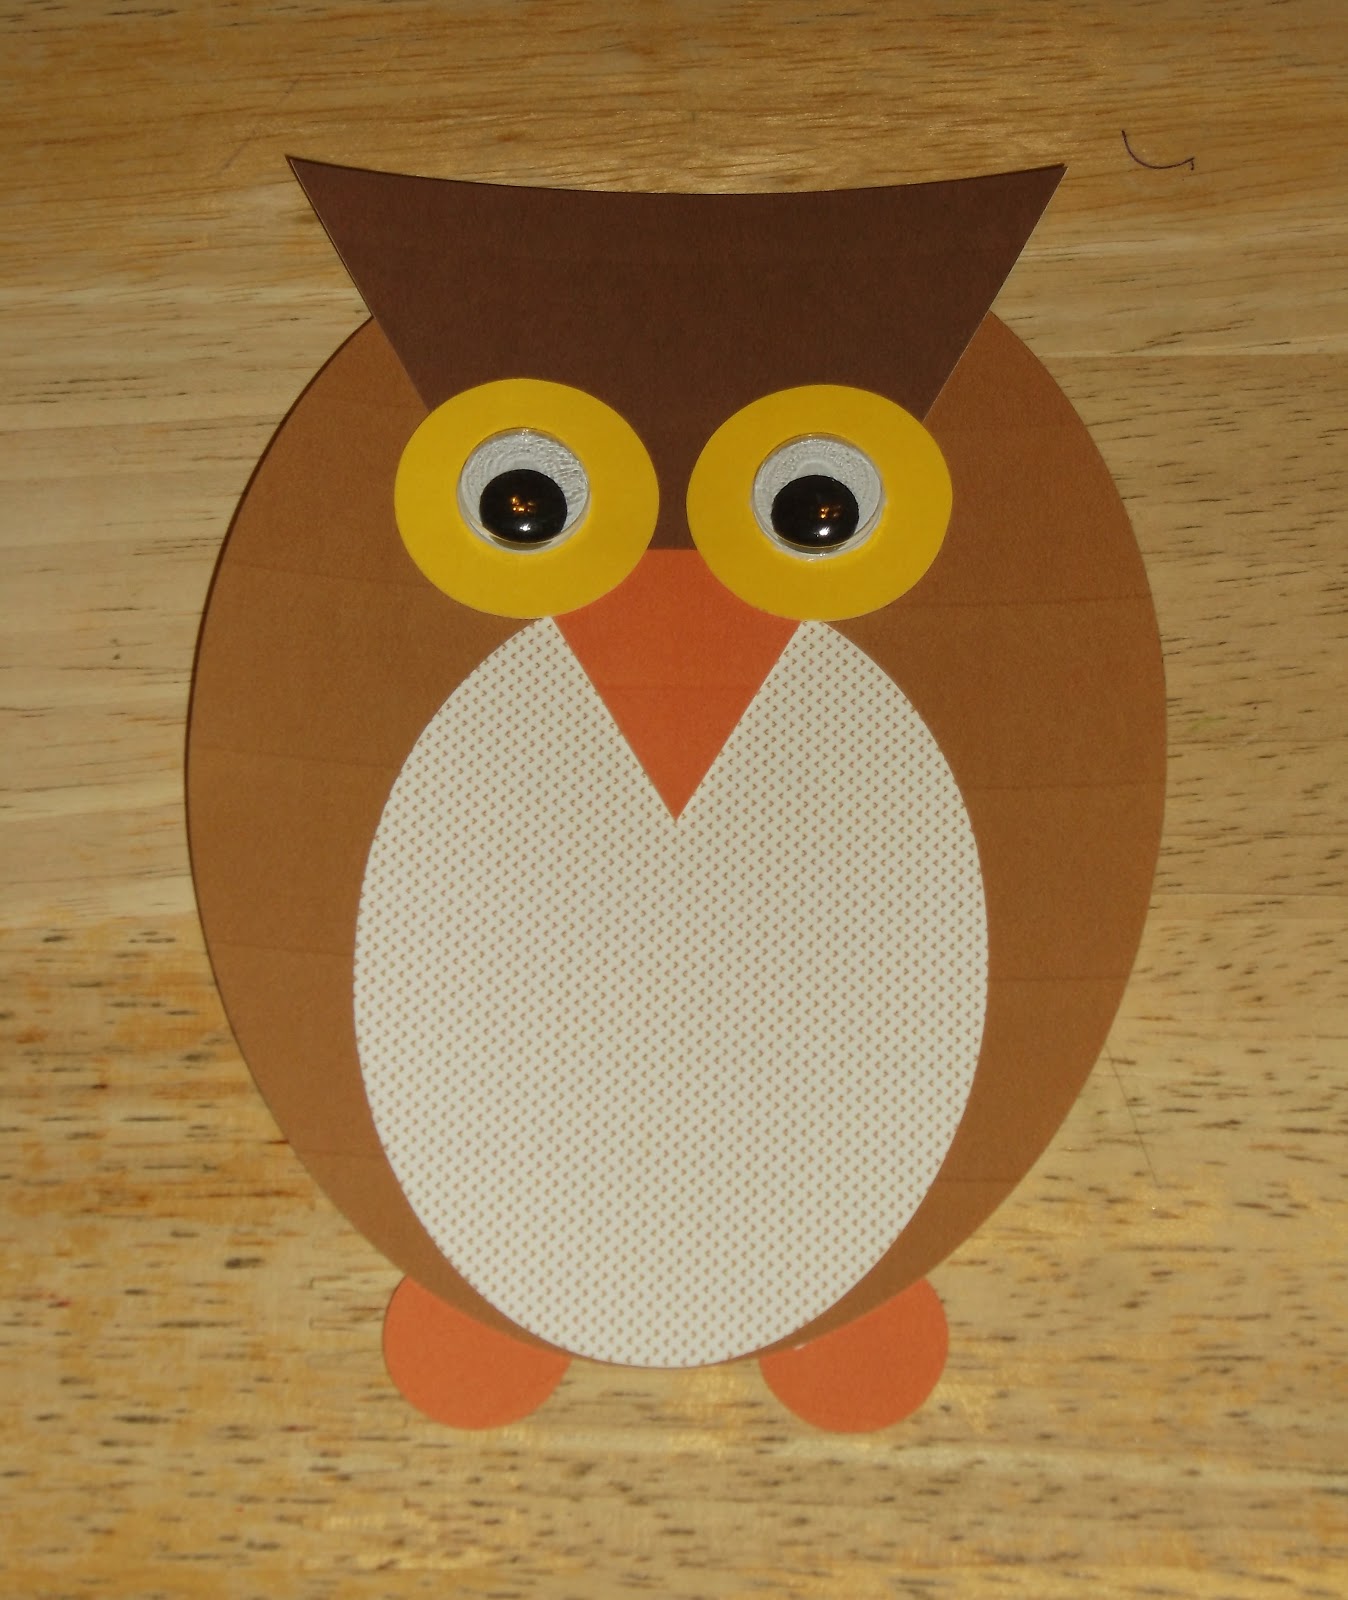
Today we read Asleep in the Stable by Will Hillenbrand and made an owl ornament.

Product Details

In this engaging book, a mama owl tells her baby owl about the Holy family.

"WHOOOO," asked Baby Owl, "is the Holy Child?"
"He is the gift from God," whoooed Mama.
"WHOOOO," said Baby Owl, "forgot to give his Holy Child feathers to keep him warm!"
"God, his Heavenly Father, has given him the warmth of his love instead of feathers," said Mama.

~from Asleep in the Stable
The illustrations in the book were done in mixed media with collage on vellum.  ~So brightly colored and simplistic.  :)

For the ornament, T made a cut-and-paste owl.


T's owl does have feet; they're glued to the back.  He insisted...and since it was his creation, I was okay with it.  
;o)

Supplies:

  • white card stock
  • scissors
  • glue
  • adhesive wiggly eyes
  • brown craft feathers
  • hole punch
  • hemp cord (for hanging)

Directions:

Print out the template.


Cut out the pieces.


Glue together the owl.

  • Glue the tan oval onto the brown oval so the bottoms line up.
  • Glue the dark brown triangle onto the brown oval so the tops line up.
  • Glue the orange triangle (beak) and the yellow circles (eyes) onto the owl.
  • Attach the wiggly eyes to the center of the yellow circles.
  • Glue the orange circles (feet) onto the bottom of the owl.


Glue on craft feathers.  Allow the ornament to dry thoroughly.


Punch a hole near the top of the ornament, add a loop of hemp cord, and hang the ornament on your Christmas tree!  :)


Linked to:
   Christmas Ornament Party
   Christmas Craft Party
   12 Days of Christmas Party
   Read Explore Learn
   Love Books
   T.G.I.F. Party #56 (Living Life Intentionally)
   Shine on Fridays
   Clever Chicks

Tuesday, November 27, 2012

If You Take a Mouse to the Movies

Today we read If You Take a Mouse to the Movies by Laura Numeroff and made a mouse ornament.

Product Details 
If you take a mouse to the movies, he'll ask you for some popcorn.  When you give him the popcorn, he'll want to string it all together.  Then he'll want to hang it on a Christmas tree.
~from If You Take a Mouse to the Movies
T made a cut-and-paste mouse ornament, complete with a string of popcorn!  :)

(A photo of T's ornament is forthcoming!)


Supplies:

  • card stock:  brown, pink, and red
  • scissors
  • glue
  • two silver brads
  • tissue paper:  white and yellow
  • red round beads*
  • white embroidery floss or thread
  • plastic needle*
  • hole punch
  • hemp cord (for hanging)

Directions:

Print the mouse at 35%:  page 1 (head and feet) onto brown and pink card stock, page 2 (arms) onto brown card stock, and page 3 (overalls) onto red card stock. (Alternative:  Print the mouse onto white card stock and color the pieces.  Most of the time, T is not overly-fond of coloring...so I went with the colored card stock.)


Cut out the pieces, except cut out only the nose and inner ears of the face printed on the pink card stock.


Glue the pieces together to form a mouse; use the pink nose and inner ears to piece onto the brown face.  Add the brads to the overalls to resemble buttons.  (We also added a piece of fabric for the pocket on the front of the overalls.)


Scrunch pieces of white and yellow tissue paper (to resemble popcorn).  String the "popcorn" and "cranberries" (red beads) to make a short garland.  Secure the ends to the mouse's hands.  (I made a tiny hole, threaded the end of the piece of floss through it, and tied a knot around the mouse's hand.)


(Alternative:  Use real popcorn.  I chose not to use real popcorn; I want to save the ornament...without attracting a bug or varmint while it's in storage!)


Punch a hole near the top of the ornament, add a loop of hemp cord, and hang it on your Christmas tree!  :)


Linked to:

   Christmas Ornament Party
   Christmas Craft Party
   12 Days of Christmas Party
   Love Books
   Shine on Fridays
   Virtual Book Club for Kids

Monday, November 26, 2012

A is for Angel

In the alphabet book, A Merry Little Christmas by Mary Engelbreit, letter A is for angel atop a tall tree.


I can't say that our tree is tall.  I placed it on top of a cedar chest...and it's still not tall!  :P  However, T did make a darling angel which we placed atop the tree.


As a matter of fact, I liked his angel so much that I decided to make a coordinating meal.


  • angel-shaped sandwich...


       with heart-shaped marshmallow wings,
       potato sticks hair,
       ring-shaped jelly candy halo, and
       facial features made out of sprinkles.
       The angel's gown is decorated with edible glitter (tiny stars).

Also included are:
  • Goldfish Space Adventures crackers (stars)
  • Cheez-It Scrabble Junior crackers
  • Holiday Treats cookies (I think they look like angel wings, no?)
  • applesauce with jumbo star sprinkles

As I was creating his meal, T came into the kitchen to check on my progress...and commented, "Cute!"  I thought that was sweet of him.  He's always so appreciative of my food fun efforts.  :)

A Merry Little Christmas

Today we read A Merry Little Christmas by Mary Engelbreit and made an angel ornament.

 Product Details
A is for angel
atop a tall tree,
aglow with the light of
what Christmas should be.

~from A Merry Little Christmas

In their tiny village in the woods, Gregory Mouse and his family are busy decorating gingerbread houses, wrapping presents, baking cookies, and sledding down snowy hills.


This is a delightful holiday alphabet book that is written in rhyme.

T made an angel with doily wings ornament.


I love the angel face he drew.  :)

Supplies:

  • card stock (any color)
  • scissors
  • sequins, trim, glitter
  • glue
  • white paper doily
  • fine point marker
  • yarn
  • gold wire garland or pipe cleaner
  • monofilament or gold cord (for hanging)

Directions:

Cut a triangle and a circle out of card stock for the angel's gown and head respectively.


Decorate the triangle with sequins and any other decorative item(s) you wish to use.


Fold the doily in half, and glue it together.  Then, glue it to the back of the triangle.


Use a marker to draw a face on the circle.  (I stamped a face using Stampkins.)  Glue the circle to the top of the triangle.


Add yarn for hair.  Shape the garland into a halo, and glue it to the back of the circle.


Let it dry thoroughly, add a loop of monofilament, and then hang the ornament on your Christmas tree!  :)


My inspiration for the ornament:
   DLTK

Linked to:
   Christmas Ornament Party
   Christmas Craft Party
   12 Days of Christmas Party
   Love Books
   Shine on Fridays