She has been making dolls for decades; however, it has only been within the last five years or so that she has gotten interested in miniatures. It's a whole other world, in a way.
Occasionally, she'll attend the Chattanooga Miniature Society Fun Day in Tennessee. This year, she invited me to go with her! I've been drooling over her collection of miniature creations, so it only took me a split second to accept her invitation. ;o)
We left yesterday afternoon for Chattanooga. The first Fun Day (of two) was today from 8:30 am to 5:00 pm, with a lunch break from 11:30 am to 1:00 pm. We had signed up for an all day class, "Odette and her Sewing Basket," taught by Winifred Holloway.
This is the prototype.
Here is Odette....
She is a 3¾” all bisque S & H doll with glass eyes.
The teacher provided us with the miniature doll; her face, stockings, and shoes already were painted. We had to make her wig, necklace, and clothes.
Here is her sewing box....
The box is a paper-mache book. We painted it gold (inside and out), cut out the "Our little Dressmaker" picture, used Mod Podge to affix it to the book, and added gold filigree book corners (stickers). We decorated the back of the book exactly like the front.
Here is Odette inside her sewing box....
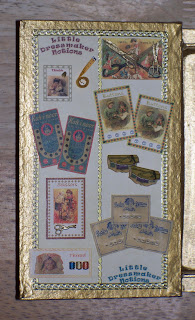
We cut out the "Little Dressmaker Notions" panels and used Mod Podge to affix them to the inside cover of the book (photo on the left). Then, we cut and added strips of gold (stickers) around the edges. We also cut out the various notions cards and glued them onto the panels. We painted miniature scissors, spools, and a thimble gold. We wrapped the spools with thread and glued them and the other embellishments (including tiny beads to represent buttons) onto the notions cards.
That coiled gold thing that looks (to me) like a rose is actually a tape measure. I didn't really care for how it looked, so I did something different. (I'll show you below.)
Inside the book (photo on the right) behind Odette are folded pieces of fabric and lace. We were supposed to use that fabric and lace to make three additional outfits for the doll (a nightgown and two other dresses). Oh...and under the pale green dress she is wearing are pantaloons.
Now, how the teacher thought we could possibly accomplish all of that in a mere seven hours is beyond me.
Well....
Here's my mom, ready to get started!
Here we are, hard at work!
Okay....
At the end of the day, I (being new to miniatures and a slow worker, mind you) felt like I had completed next to nothing! In truth, I had completed next to nothing. :P
Supper was provided at the site. When my mom and I returned to our hotel room afterward, I did work until bedtime...and I finished the box (book). yay! lol.
This is my finished sewing box.
As mentioned above, I did the inside a little different from the prototype. During lunchtime, my mom had purchased some miniature sewing items, and I used that tape measure for my box.
It was a fun, albeit long day. :)
By the way...this is a very detailed post, because I'm pretty sure my sister will be reading this...and she likes all the details (being a doll lover and collector, too!) :D


No comments:
Post a Comment