I was able to attend the SouthEast Homeschool Convention in Greenville, South Carolina this past weekend...actually, last Thursday through Saturday.
I am so grateful to my husband for taking vacation days from work in order to watch T. The convention did offer a children's program, but it was so much easier for me...and less expensive ;o) ...for my husband to take care of him. They had a good time together. They went to the zoo and did all kinds of other fun stuff.
Anyway...back to the convention. It was awesome! I attended some terrific workshops:
o Stop the Yelling, Lecturing, and Power Struggles
o Overcoming Being Overwhelmed
o Beginning Reading: How to Make Sure Your Child Succeeds at Reading
o 25 Ways to Significantly Cut Your Grocery Bill Without Clipping Coupons
o Tuning In to Your Homeschooler's Unique Learning Pathway
o Help! It's 5:00, and We're Still Doing School!
o Active Child? ADHD? Laying the Groundwork for Solutions
o Helping Our Kids See the Glory of God
o Mary and Martha Decide to Homeschool: A Workshop for Mary's Only!
o Discovering My Child's Learning Style
I also was able to purchase CDs for the workshops I wanted to attend but wasn't able to...because of too many "good" workshops in the same time slot, or because of a need to browse the exhibit hall. :)
The exhibit hall had a massive number of exhibitors...170+, I believe! I enjoyed being able to talk with the vendors and to view their products. Also, all of the vendors offered some sort of "event special" or discount...a terrific way to save some money on the cost of curriculum or other materials.
Amazingly, I won a drawing for a book from EI School of Biblical Training. How fun is that?!!
Amazingly, another attendee offered me her ticket to the Tim Hawkins comedy performance. Apparently, she is a nurse and was called in to work on Saturday evening. ~How kind of her...and how wonderful that she chose me to whom to give her ticket! I had never seen Tim Hawkins before; it was a sold-out show, and I saw why. I laughed for a solid hour and a half! :) He was so funny.
I received an e-mail yesterday from Sonlight with the link to an article: Homeschool Convention Survivor's Guide. Ummm...it might have been helpful to have had that before the convention! ;o)
I'm so glad I attended. Now all I need to do is find the time to:
o review the spiral-bound notebook I filled with notes, and
o wade through the colossal pile of catalogs, brochures, etc. I picked up/was given!
I love conventions!!
Wednesday, March 20, 2013
Thursday, February 14, 2013
Valentine's Day Supper
We celebrated Valentine's Day at home with a candlelit supper...very simple.

My husband and I ate Stouffer's Lasagna...a tradition since before we were married (the lasagna part...not necessarily the Stouffer's part!). I made meatloaf and mashed potatoes for T...his favorites...since he's allergic to tomato-based foods.
For dessert, we made s'mores...with heart-shaped marshmallows!

~So fun!!

At the end of an evening full of festivities, T was tuckered out!

<3 Lots of love! <3
Friday, February 8, 2013
Snowy Mountain Peaks
This afternoon, I baked some Snowy Peaks cupcakes. I thought they would be a delicious winter treat. Mmmm! Ü

Here is the recipe (as I revised it*), in case you want to bake some Snowy Peaks, too. :)
1 box white cake mix, plus ingredients to prepare mix
4 egg whites, at room temperature
6 tablespoons sugar
Preheat oven to 350°F. Line 10 jumbo muffin cups with paper baking cups. Prepare cake mix according to directions on box. Spoon batter into prepared muffin cups, filling two-thirds full.
Bake 20 to 25 minutes or until toothpick inserted into center comes out clean. Cool in pan 10 minutes. Remove to wire rack; cool completely.
Increase oven temperature to 375°F. Beat egg whites in medium bowl with electric mixer at high speed until soft peaks form. Gradually add sugar, beating until stiff peaks form. Pipe or spread meringue on each cupcake.
Place cupcakes on a baking tray. Bake 5 minutes or until peaks of meringue are golden.
Makes 10 jumbo cupcakes
source of inspiration (*I did not follow the recipe exactly): Publications International, Ltd. Cupcakes & Fun Stuff, Vol. 3, No. 41

Here is the recipe (as I revised it*), in case you want to bake some Snowy Peaks, too. :)
Snowy Peaks
1 box white cake mix, plus ingredients to prepare mix
4 egg whites, at room temperature
6 tablespoons sugar
Preheat oven to 350°F. Line 10 jumbo muffin cups with paper baking cups. Prepare cake mix according to directions on box. Spoon batter into prepared muffin cups, filling two-thirds full.
Bake 20 to 25 minutes or until toothpick inserted into center comes out clean. Cool in pan 10 minutes. Remove to wire rack; cool completely.
Increase oven temperature to 375°F. Beat egg whites in medium bowl with electric mixer at high speed until soft peaks form. Gradually add sugar, beating until stiff peaks form. Pipe or spread meringue on each cupcake.
Place cupcakes on a baking tray. Bake 5 minutes or until peaks of meringue are golden.
Makes 10 jumbo cupcakes
source of inspiration (*I did not follow the recipe exactly): Publications International, Ltd. Cupcakes & Fun Stuff, Vol. 3, No. 41
Tuesday, February 5, 2013
Winter Sleigh Ride

I don't know if sleigh riding qualifies as a winter sport (the Bento Blog Network theme this week)...but if not, we can pretend, right? It's definitely a winter activity, and that's good enough for me! :)

This was T's lunch today.
- sleigh = peanut butter and jelly sandwich with colored sugar, sprinkles, and jumbo sprinkles to decorate
- Hello Kitty = peanut butter and jelly sandwich with jimmies and sprinkles to decorate (The bow is two heart-shaped savory crackers with colored sugar and a jumbo snowflake sprinkle.)
- snow = popcorn
- snow-covered evergreen tree = Little Debbie cake (from my freezer!)
I used the sleigh cutter to cut off the bottom of the Hello Kitty bread to make it appear that she is riding in the sleigh.

Thursday, January 31, 2013
Luv It!
I was so thrilled when I was contacted by FunBites to do a review. My first impression upon receiving the FunBites Luv It! food tool was Wow, that's nice -- heavy-duty and well-made, and a very fun, vivid color! Obviously, T shared my opinion. I had put the cutter at the Very Back of the counter...and when I returned to the kitchen less than 15 minutes later, T already had "discovered" it and checked it out; I found it at the Front of a Different counter! ;o)
I tried a new recipe for Savory Crackers...and used my new foodtoy tool.
I placed the FunBites cutter on the pie crust.

Using the handles, I rocked it back and forth a few times. In a matter of seconds, I had lots of geometric shapes!

Using the FunBites insert, I popped the shapes out of the cutter and onto my baking sheet. (That insert is a genius idea!!)

I used the geometric shapes to make fun pictures:
a sun for me...

and a king wearing his crown for T.

My husband informed me that the king's mustache is upside down...and that that's why he doesn't look more like a king. Oh. Okay. I get it.
Before T and I enjoyed eating our snack, I had to get in a little "shapes" practice! ;o)
T used his FunBites geometric shapes to help Elmo hunt for shapes.

After we finished playing with our food, I cleaned up in a snap. The FunBites set can be hand washed -- the FunBites preferred method -- or put in the dishwasher -- my preferred method. <g> (I do love that it is dishwasher safe.)
Not only is FunBites really easy and fun to use, it also is BPA free. I like that.
FunBites has another cutter, FunBites Cube It!, that cuts food into little squares.
Wouldn't this lunch have been quicker and easier to prepare using the FunBites Cube It!??

Would you like a FunBites Luv It! of your own...just in time for Valentine's Day, no less?! You can purchase one at www.FunBites.com...and FunBites generously has offered Free Shipping! Just enter the code, ValentineFun. While you're there, you can check out all of the other terrific food ideas using FunBites!
Disclosure: FunBites provided me with their Luv It! product to review on my blog. The opinions I have expressed are my own; they were not influenced by the company or the complimentary product I received.
Linked to:
Bento Blog Network
 |
| photo source: FunBites |
I tried a new recipe for Savory Crackers...and used my new food
The FunBites Luv It! was so easy and FUN to use! After unrolling a pie crust, I cut it into many geometric shapes.
I placed the FunBites cutter on the pie crust.

Using the handles, I rocked it back and forth a few times. In a matter of seconds, I had lots of geometric shapes!

Using the FunBites insert, I popped the shapes out of the cutter and onto my baking sheet. (That insert is a genius idea!!)

I used the geometric shapes to make fun pictures:
a sun for me...

and a king wearing his crown for T.

My husband informed me that the king's mustache is upside down...and that that's why he doesn't look more like a king. Oh. Okay. I get it.
Before T and I enjoyed eating our snack, I had to get in a little "shapes" practice! ;o)
T used his FunBites geometric shapes to help Elmo hunt for shapes.

After we finished playing with our food, I cleaned up in a snap. The FunBites set can be hand washed -- the FunBites preferred method -- or put in the dishwasher -- my preferred method. <g> (I do love that it is dishwasher safe.)
Not only is FunBites really easy and fun to use, it also is BPA free. I like that.
FunBites has another cutter, FunBites Cube It!, that cuts food into little squares.
 |
| photo source: FunBites |
Wouldn't this lunch have been quicker and easier to prepare using the FunBites Cube It!??
Would you like a FunBites Luv It! of your own...just in time for Valentine's Day, no less?! You can purchase one at www.FunBites.com...and FunBites generously has offered Free Shipping! Just enter the code, ValentineFun. While you're there, you can check out all of the other terrific food ideas using FunBites!
Disclosure: FunBites provided me with their Luv It! product to review on my blog. The opinions I have expressed are my own; they were not influenced by the company or the complimentary product I received.
Linked to:
Bento Blog Network
Tuesday, December 18, 2012
Ho Ho Ho!
We went to the mall this afternoon so T could sit on Santa's lap!

Santa gave T a gingerbread man cookie. ~Sweet! :)

Santa gave T a gingerbread man cookie. ~Sweet! :)
Monday, December 17, 2012
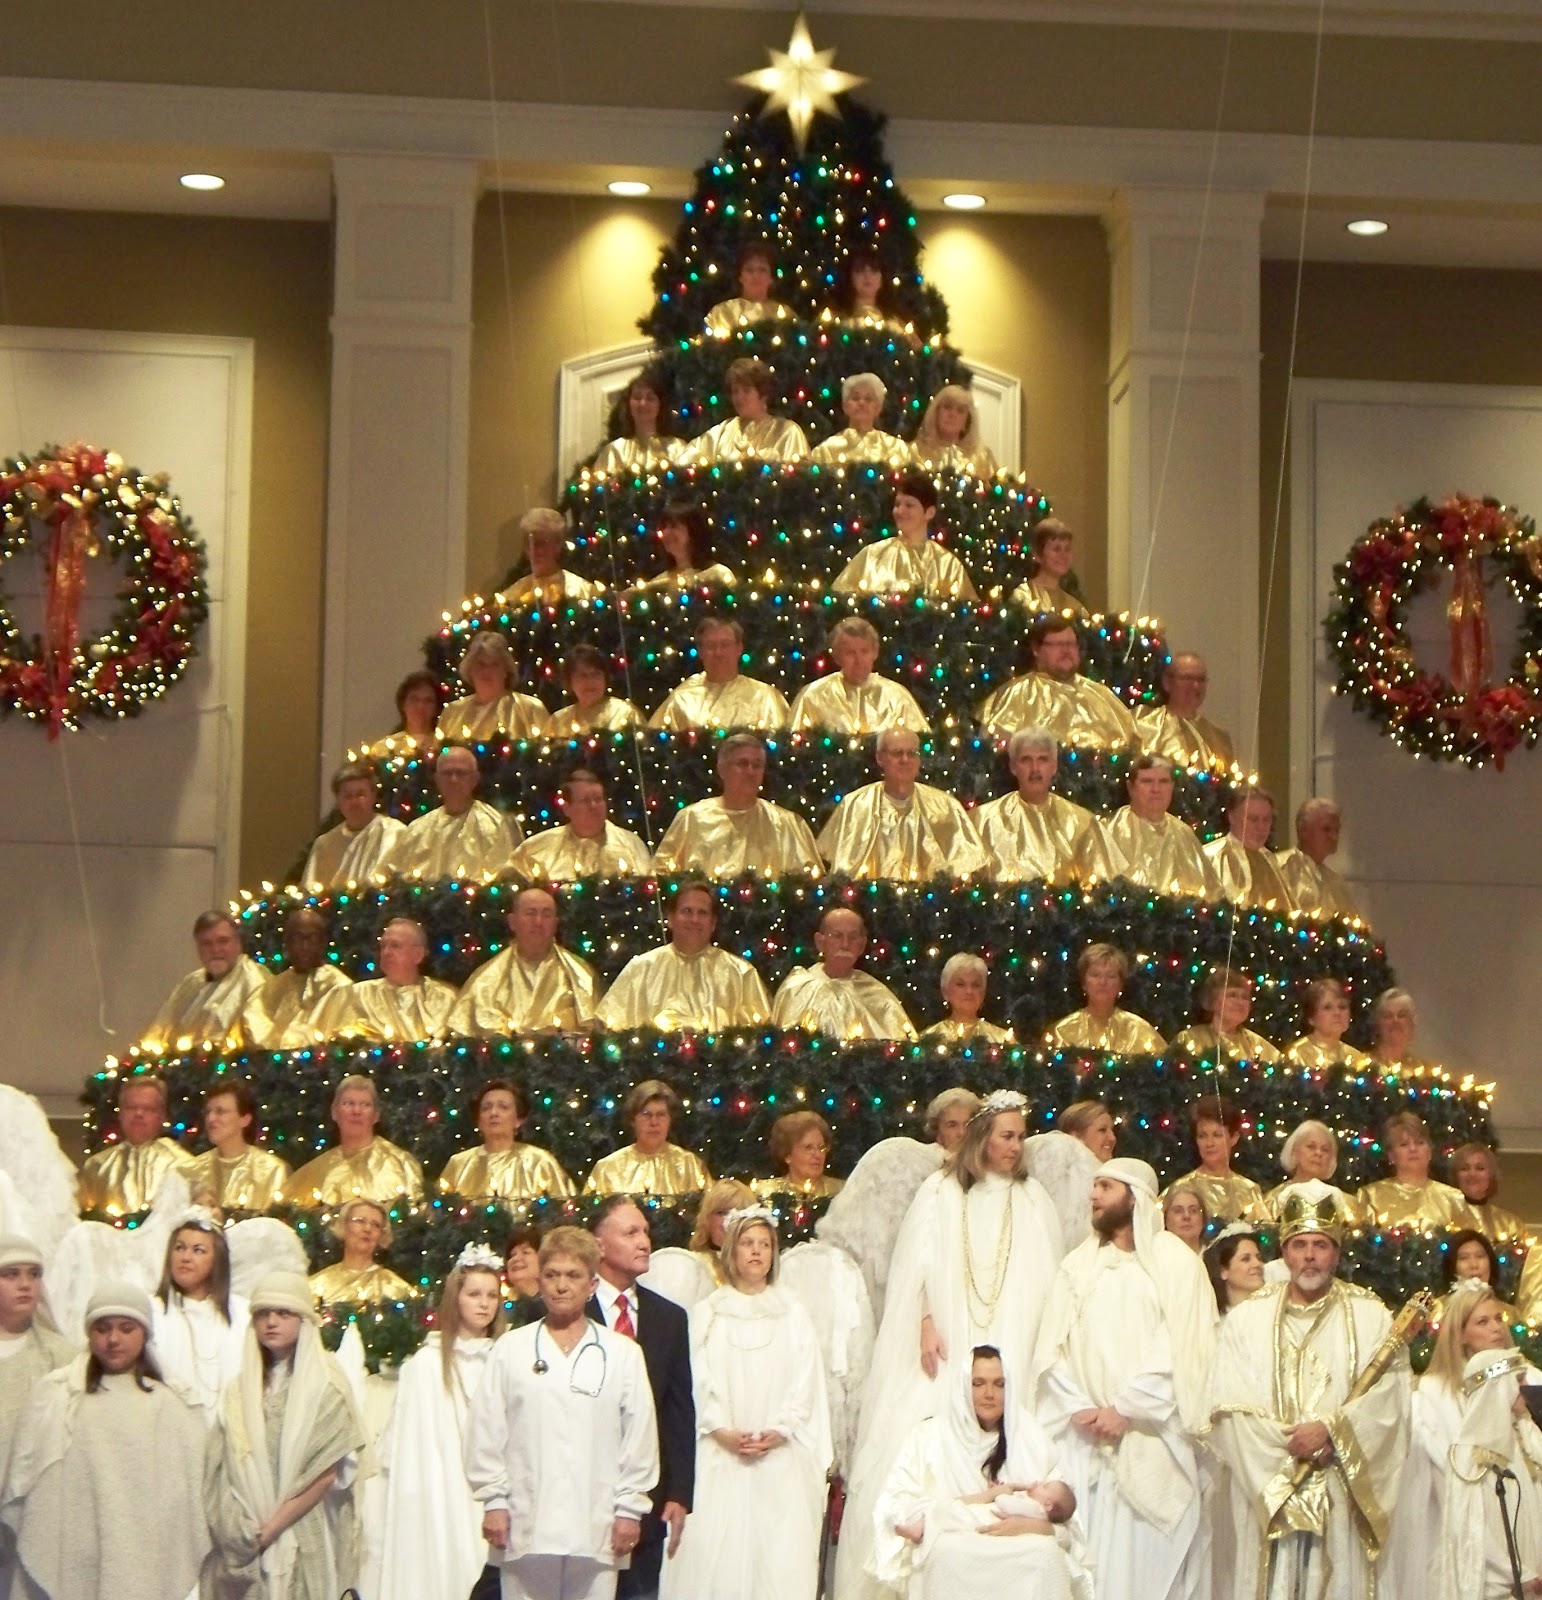
Living Christmas Tree
We went to hear The Living Christmas Tree performance this evening.

I discovered some interesting facts about this tree.
The music was wonderful; we all were glad we attended. :)
I discovered some interesting facts about this tree.
The "Living Christmas Tree" is constructed of 4,000 pounds of steel and plywood flooring. It stands 35½ feet from the floor to the tip of the star. Over a mile of electrical wiring is used in lighting the 35,000 bulbs in five colors. Fifteen hundred feet of artificial greenery is on the tree. The tree weighs more than 10 tons when loaded with adult singers.
The music was wonderful; we all were glad we attended. :)
Thursday, December 13, 2012
Rudolph the Red-Nosed Reindeer
Today we read Rudolph the Red-Nosed Reindeer as adapted by Rick Bunsen and made a Rudolph ornament.

Rudolph is a reindeer with a glowing nose. When the other reindeer make fun of him, Rudolph runs away. Hermey, a misfit elf, and Yukon Cornelius, a prospector, help Rudolph learn that he shouldn't run away from his problems. Rudolph returns to the North Pole and discovers that Santa desperately needs his help!
T loves this story. We have the DVD, also, which T watches all year long! ;o)

Supplies:
Directions:
Paint the craft sticks brown. Allow them to dry thoroughly.
Glue together two crafts sticks to form a "V" shape. Glue the third craft stick on top of the "V" and close to the top* of the "V" to form a triangle. *Allow approximately an inch of the top of the "V" to stick up (to resemble antlers). Allow the ends of the third craft stick to stick out beyond the "V" (to resemble ears).

Glue a red pom-pom to the tip of the "V" (for the nose).
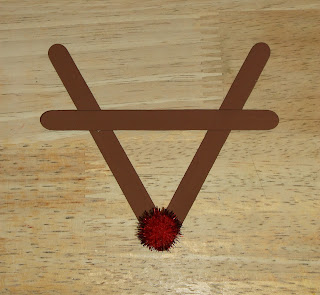
Glue two wiggly eyes to the "V" below the third craft stick.

Glue a piece of hemp cord to the top back of the ornament. Let it dry thoroughly, and then hang the ornament on your Christmas tree! :)

My inspiration for the ornament:
DLTK
The Ramblings of a Crazy Woman
Linked to:
Christmas Ornament Party
Christmas Craft Party
12 Days of Christmas Party
Read Explore Learn
Read-Aloud Thursday
The Children's Bookshelf
Love Books
Mom's Library
Learn & Link
Link & Learn
For the Kids Friday
T.G.I.F. Party
Shine on Fridays
Show-and Share Saturday
Show & Tell
Tip-Toe Thru Tuesday
Enchanted Thursdays
Clever Chicks
Pin Me Party
Rudolph is a reindeer with a glowing nose. When the other reindeer make fun of him, Rudolph runs away. Hermey, a misfit elf, and Yukon Cornelius, a prospector, help Rudolph learn that he shouldn't run away from his problems. Rudolph returns to the North Pole and discovers that Santa desperately needs his help!
T loves this story. We have the DVD, also, which T watches all year long! ;o)
Rudolph, the red-nosed reindeer
had a very shiny nose.
And if you ever saw him,
you would even say it glows.
Working as an advertising executive, Robert May had a natural flair with words and was able to compose the Rudolph the Red-Nosed Reindeer poem which was specifically designed to appeal to children. This marketing ploy was a massive success, and approximately 2.5 million poems were given away in the first year of its publication.
In 1949, singer Gene Autry recorded a musical version of Rudolph the Red-Nosed Reindeer, composed by Johnny Marks.T made a Rudolph ornament from craft sticks.

Supplies:
- three craft sticks
- brown paint
- paintbrush
- glue
- wiggly eyes
- red pom-pom
- hemp cord (for hanging)
Directions:
Paint the craft sticks brown. Allow them to dry thoroughly.
Glue together two crafts sticks to form a "V" shape. Glue the third craft stick on top of the "V" and close to the top* of the "V" to form a triangle. *Allow approximately an inch of the top of the "V" to stick up (to resemble antlers). Allow the ends of the third craft stick to stick out beyond the "V" (to resemble ears).

Glue a red pom-pom to the tip of the "V" (for the nose).

Glue two wiggly eyes to the "V" below the third craft stick.

Glue a piece of hemp cord to the top back of the ornament. Let it dry thoroughly, and then hang the ornament on your Christmas tree! :)

My inspiration for the ornament:
The Ramblings of a Crazy Woman
Linked to:
Christmas Ornament Party
Christmas Craft Party
12 Days of Christmas Party
Read Explore Learn
Read-Aloud Thursday
The Children's Bookshelf
Love Books
Mom's Library
Learn & Link
Link & Learn
For the Kids Friday
T.G.I.F. Party
Shine on Fridays
Show-and Share Saturday
Show & Tell
Tip-Toe Thru Tuesday
Enchanted Thursdays
Clever Chicks
Pin Me Party
Tuesday, December 11, 2012
Picture Time
T brought the camera to me yesterday and asked me to take his picture. Now that doesn't happen very often! I was happy to oblige. ;o)
Here he is...in front of "his" Christmas tree. :)

Here he is...in front of "his" Christmas tree. :)

Monday, December 10, 2012
O Little Town of Bethlehem
Today we read O Little Town of Bethlehem by David Mead and Chris Sharp and made a town of Bethlehem ornament.

T made a town of Bethlehem CD ornament.

Supplies:

Directions:
Print the town of Bethlehem, and cut it out.


Glue the picture to the center of the back of the CD.
Glue a yellow circle to the front of the CD, catching the ends of a piece of ribbon under the edge.
Let it dry thoroughly, and then hang the ornament on your Christmas tree! :)

Linked to:
Christmas Ornament Party
Christmas Craft Party
12 Days of Christmas Party
Focus on the Nativity
Love Books
T.G.I.F. Party #57
Shine on Fridays
Clever Chicks #12
Pin Me Party #10
O little town of BethlehemThis board book features instrumental music and lights. The Christmas carol, "O Little Town of Bethlehem," plays and stars light up when the cover is opened. The story of the first Christmas is presented very simply.
how still we see thee lie.
Above thy deep and dreamless sleep
the silent stars go by.
~from O Little Town of Bethlehem
T made a town of Bethlehem CD ornament.

Supplies:
- bright yellow card stock
- scissors
- CD
- glue
- ribbon (for hanging)

Directions:
Print the town of Bethlehem, and cut it out.


Glue the picture to the center of the back of the CD.
 |
| Front of the ornament = Back of the CD |
Glue a yellow circle to the front of the CD, catching the ends of a piece of ribbon under the edge.
 |
| Back of the ornament = Front of the CD |
Let it dry thoroughly, and then hang the ornament on your Christmas tree! :)

Linked to:
Christmas Ornament Party
Christmas Craft Party
12 Days of Christmas Party
Focus on the Nativity
Love Books
T.G.I.F. Party #57
Shine on Fridays
Clever Chicks #12
Pin Me Party #10
Friday, December 7, 2012
The Polar Express
T was so excited to go to the book store tonight...

to hear a reading of the book, The Polar Express by Chris Van Allsburg.


Finally...it was time for the story!

One of the book store employees read it to us.

T listened carefully, as did his papa. :)

Afterward, each of us was given a cookie from the in-store cafe...

a yummy sugar cookie!

It was an enjoyable holiday event for our family.

Did you notice that T wore his train hoodie (and long-sleeved t-shirt) in celebration of the occasion? ;o)

to hear a reading of the book, The Polar Express by Chris Van Allsburg.
While we waited, T looked at books.

Finally...it was time for the story!

One of the book store employees read it to us.

T listened carefully, as did his papa. :)

Afterward, each of us was given a cookie from the in-store cafe...

a yummy sugar cookie!

It was an enjoyable holiday event for our family.

Did you notice that T wore his train hoodie (and long-sleeved t-shirt) in celebration of the occasion? ;o)
Tuesday, December 4, 2012
A Winter Secret
This afternoon, T and I went to a book store to hear an author read a Christmas poem she wrote.
She's written a number of books; however, this poem is not available in book form....It was made into a movie.
Afterward, T received an ornament which the author personalized and autographed.

Then, T had the opportunity to make an ornament with materials the book store provided. There was a display of five different ornaments, and T was allowed to choose which one he wanted to make.He *We* chose the ornament that most closely resembled the story line of the poem. T did a great job...

and was pleased with the outcome! ;o)


 |
| Dawn Watkins author |
She's written a number of books; however, this poem is not available in book form....It was made into a movie.
 |
| A Winter Secret DVD |
Afterward, T received an ornament which the author personalized and autographed.

Tanasee could not
close the door now,
For wonder.
It was no tree at all,
Swaying on the high hill.
It was a great stag...
~from A Winter Secret
Then, T had the opportunity to make an ornament with materials the book store provided. There was a display of five different ornaments, and T was allowed to choose which one he wanted to make.

and was pleased with the outcome! ;o)


Subscribe to:
Posts (Atom)